

It starts with a sharp, stinging pinch after running a hand along an old wooden deck railing, gardening without gloves, or stepping barefoot across a hardwood floor. Within minutes, what looks like an insignificant speck under the skin turns into a throbbing nuisance that hurts every time pressure is applied. For parents, hearing a child cry out from an unexpected splinter can turn a calm afternoon into a stressful ordeal filled with tears and squirming.
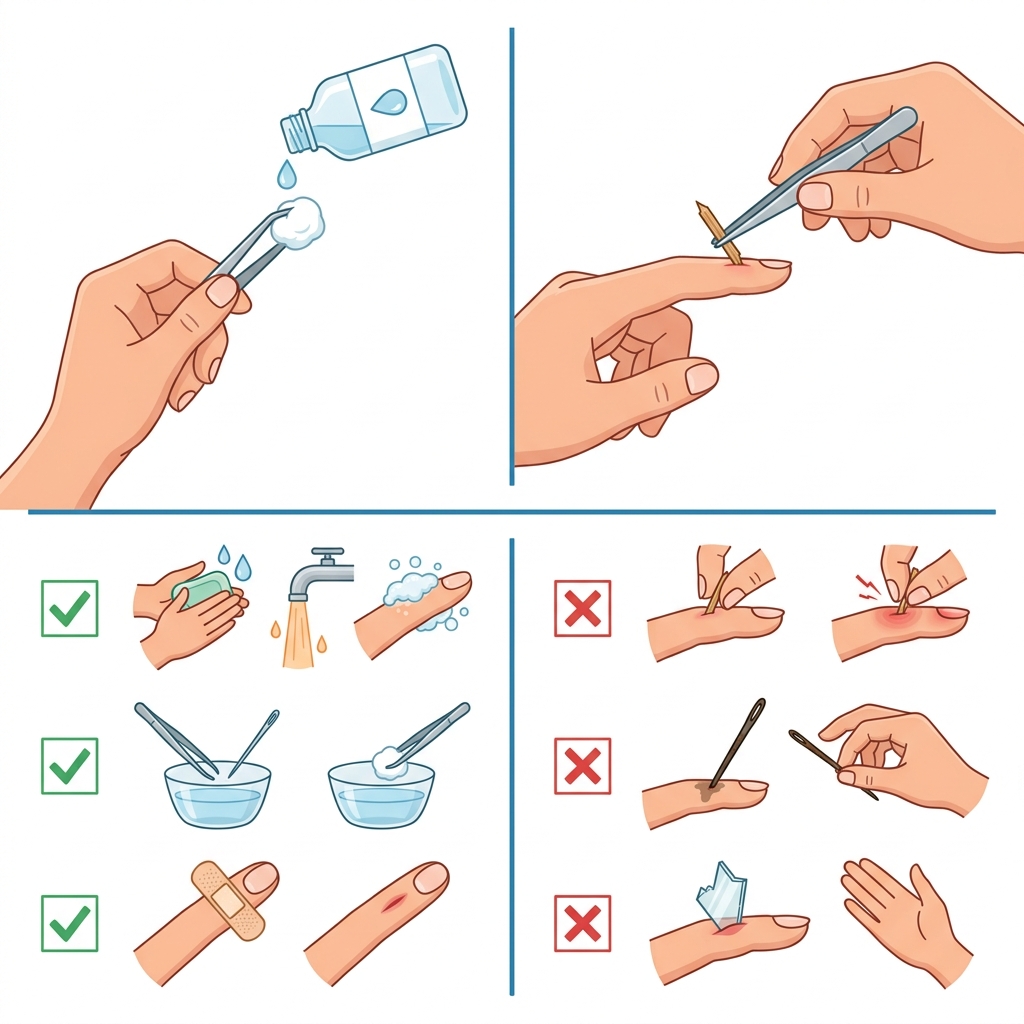
While most cutaneous foreign bodies—commonly known as splinters—are minor domestic injuries, attempting to remove them incorrectly can easily drive the fragment deeper, fracture it into microscopic shards, or introduce pathogenic bacteria into vulnerable tissue layers. Whether dealing with organic matter like wood and thorns or inorganic material such as glass and metal, following proper antiseptic technique ensures pain-free removal and protects against complications like cellulitis or secondary bacterial infections.
⚡ Key Clinical Takeaways.
- Never squeeze or pinch: Squeezing the skin around a splinter fractures delicate fragments (especially wood or glass) and drives them deeper into the subcutaneous layers.
- Aseptic preparation is mandatory: Always wash hands and the affected site with warm water and mild antibacterial soap, and sterilize tweezers and needles using 70% isopropyl rubbing alcohol.
- Follow the angle of entry: Grasp the protruding end firmly and extract the foreign body parallel to the trajectory it entered to prevent shearing.
- Check immunization history: Deep, organic, soil-contaminated, or rusted foreign bodies carry a risk for Clostridium tetani infection; verify that your tetanus vaccination booster is within the recommended 5 to 10-year window.
What Is a Splinter? Mechanism and Foreign Body Classifications.
In dermatological terms, a splinter is a mechanical penetration of the epidermis or dermis by a foreign body (corpus alienum). Once the foreign material breaches the protective cutaneous barrier, the surrounding tissue initiates a localized inflammatory cascade, releasing histamine and recruiting neutrophils to isolate the foreign object.
Foreign bodies generally fall into two broad classifications, each carrying distinct clinical considerations:
- Organic Foreign Bodies (Wood, Plant Thorns, Cactus Spines): Highly porous and prone to carrying environmental micro-organisms, fungal spores, and bacteria (such as Staphylococcus aureus, Pseudomonas aeruginosa, or Sporothrix). Organic splinters do not resolve well if left in place; they cause pronounced inflammatory reactions, foreign body granulomas, and rapid secondary suppuration.
- Inorganic Foreign Bodies (Glass, Metal Filings, Plastic): Chemically inert compared to organic materials, but structurally hazardous. Glass fragments easily shatter under compressive pressure, creating multiple impalpable micro-slivers. Metal fragments can introduce industrial lubricants or rust-associated bacterial pathogens.
Clinical signs: How to Identify an Embedded Splinter.
While many splinters are visible right away upon entry, small transparent glass slivers or hair-thin cactus glochids can be deceptive. Typical signs and symptoms include:
- Direct Visual Presentation: A discrete dark speck, line, or localized discoloration beneath the superficial keratin layer of the skin, most often localized on the hands, fingers, soles of the feet, or nail margins.
- Point Tenderness: Sharp, focal discomfort provoked by palpation or mechanical pressure (such as walking on a heel containing a plantar splinter).
- Foreign Body Sensation: A persistent feeling of friction, pricking, or tightness beneath the skin during normal motion or flexion.
- Early Reactive Erythema: Mild localized redness and edema surrounding the punctate entrance wound as the body's innate immunity responds.
Step-by-Step Medical Guide: How to Safely Remove a Splinter at Home.
According to clinical guidelines established by organizations like the NHS and the Mayo Clinic, minor superficial splinters can be managed safely at home provided sterile technique is strictly maintained.
Step 1: Cleanse the Area Thoroughly.
Before touching the wound, wash your hands thoroughly with antimicrobial soap and warm running water for at least 20 seconds. Cleanse the skin surrounding the splinter gently using warm soapy water. Pat the area dry using a sterile gauze swab or a freshly washed towel. Avoid vigorous scrubbing, which can sheer off an exposed edge.
Step 2: Inspect Under Optimal Light and Magnification.
Position yourself beneath a strong, direct light source. Use a magnifying glass or a smartphone camera with macro-zoom enabled to inspect the exact depth, angle of penetration, and whether the foreign body is intact or fragmented.
Step 3: Sterilize Your Instruments.
Gather fine-tipped precision tweezers and, if the object is submerged beneath a thin film of skin, a clean sewing needle. Disinfect the operational tips of both tools by wiping them thoroughly with a sterile swab saturated with 70% isopropyl alcohol (rubbing alcohol). Allow the instruments to air-dry completely on a sterile gauze pad. Do not rely on open flames (such as matches or lighters), which leave irritating carbon soot deposits on metal tips.
Step 4: Extraction Technique for Exposed Splinters.
If the tip of the foreign body protrudes above the skin surface:
- Carefully position the sterilized tweezer tips at the base of the protruding fragment, as close to the skin entry point as possible.
- Apply steady, gentle pressure to grip the splinter firmly without crushing it.
- Slowly and smoothly withdraw the splinter following the exact reverse angle of entry. Pulling straight upward when a splinter entered diagonally can snap the shaft, leaving fragments embedded deep in the dermis.
Step 5: Extraction Technique for Sub-Epidermal (Completely Embedded) Splinters.
If the foreign object is entirely sealed beneath the translucent stratum corneum (outermost skin layer):
- Take your sterilized needle and gently score or unroof the paper-thin layer of dead skin directly above the foreign body. Work parallel to the splinter, not poking straight down.
- Once an edge is uncovered, use the needle tip to gently elevate one end until it can be grasped with the tweezers.
- Grip the exposed end with the tweezers and draw the foreign body out cleanly along its entry tract.
Step 6: Post-Extraction Wound Antisepsis and Dressing.
Once removed, inspect the splinter on a white background to confirm it was retrieved intact. Wash the puncture site once more with soap and warm water. Apply a thin layer of over-the-counter petroleum jelly or topical antibiotic ointment (e.g., polymyxin/bacitracin) to create an occlusive healing barrier, and cover with a sterile adhesive bandage to guard against opportunistic surface pathogens.
Pediatric Considerations: Keeping Children Calm.
Children are often distressed by needles and tweezers. When treating a young child, establish a calm, non-threatening environment. Use age-appropriate distraction techniques—such as playing their favorite song, streaming an animated show, or asking them to describe a story—to keep their limbs steady. Never rush the extraction, as sudden movements increase the risk of accidental puncture or splinter breakage.
Home Removal vs. Clinical Intervention: Do's and Don'ts.
Proper first aid hinges on avoiding conventional household myths that increase tissue trauma or microbial inoculation.
| Clinically Approved Practices (DO). | Dangerous Household Practices (DON'T). |
|---|---|
| Cleanse first: Wash hands and the wound site with gentle soap and warm water before handling instruments. | Do not squeeze: Squeezing acts like a hydraulic press, snapping fragments and forcing foreign material deeper. |
| Sterilize with 70% alcohol: Use isopropyl alcohol wipes on all tweezers and fine-point needles. | Avoid flame sterilization: Using a lighter or candle leaves charred carbon flakes that contaminate the wound track. |
| Pull at the entry angle: Maintain a gentle, constant pull along the splinter's entry vector. | Do not perform deep excavation: Digging into deep dermal layers damages tissue, risks nerve injury, and forms scars. |
| Verify tetanus status: Confirm that tetanus toxoid vaccination boosters are current within 5 to 10 years. | Avoid unproven drawing salves: Do not rely on unregulated topical concoctions to "draw out" deeply embedded objects. |
🚨 Red Flags: When to Seek Immediate Medical Evaluation.
Certain foreign body injuries cannot be safely managed at home and require evaluation by a doctor, an urgent care clinic, or an Emergency Department (ED / A&E). Call 911 (US/Canada), 999 (UK), or proceed to the nearest emergency room right away if you encounter:
- Ocular or Periorbital Involvement: Any splinter located in, penetrating, or directly adjacent to the eyeball or eyelid. Cover both eyes gently without pressure and seek immediate emergency ophthalmic care.
- Subungual Impaction: Splinters embedded deeply beneath a fingernail or toenail bed that cannot be reached without invasive intervention.
- Deep, Non-Palpable, or Arterial-Adjacent Objects: Foreign bodies that have penetrated deeply into muscles, tendons, or joint capsules, or are accompanied by pulsatile, uncontrolled bleeding.
- Spreading Cellulitis & Systemic Sepsis Signs: Advancing erythema (red streaks radiating toward the heart), skin that is hot and indurated, purulent discharge (pus), localized fluctuance (abscess), rigors, or a fever above 100.4°F (38.0°C).
- Outdated Tetanus Status: The patient has had fewer than 3 primary tetanus doses, or the puncture was caused by dirty soil, feces, or rusty material and the last booster was given over 5 years ago.
Preventive Strategies: Reducing Cutaneous Puncture Risks.
Preventing penetrating foreign body injuries requires practical environmental awareness, especially in high-risk recreational and working environments:
- Protective Footwear: Wear closed shoes or thick-soled sandals on wooden boardwalks, garden decks, docks, piers, and around swimming pool surrounds where weathered wood is prone to splintering.
- Appropriate PPE in Gardening and Carpentry: Wear heavy-duty leather or reinforced nitrile work gloves whenever handling rough timber, pruning thorny shrubs (e.g., roses, pyracantha, bougainvillea), handling untreated pallets, or clearing yard debris.
- Immediate Glass Disposal Protocol: Clean broken glassware promptly by sweeping thoroughly and following with a vacuum or a damp disposable paper towel to collect microscopic slivers. Never walk barefoot in areas where glass has shattered.
- Maintenance of Wooden Structures: Inspect, sand down, and reseal domestic wooden decks, handrails, and outdoor children's wooden playsets regularly to eliminate deteriorating surface splinters.
🩺 Doctor's Clinical Note.
"In clinical practice, the most difficult splinters we see in the emergency department or primary clinic are not the ones that just happened—they are the ones patients spent days aggressively poking, squeezing, and digging at with unsterilized tools. When you squeeze an embedded wood splinter, you often fracture a single clean shaft into multiple fragile fibers, turning a 2-minute minor extraction into a procedure requiring local anesthesia. If a splinter cannot be retrieved easily after one or two gentle attempts with sterile tweezers, stop, bandage the area, and let a doctor evaluate it. Preserving skin integrity and preventing infection is always the clinical priority."


💬 Comments (0)
No comments yet. Be the first to share your thoughts here.
Add Your Comment